Common Worm Gearbox Problems and Solutions: Field-Tested Troubleshooting Guide
A production line shutdown at 2 AM costs money every minute. In our two decades manufacturing worm gearboxes, we’ve analyzed thousands of field failures—and 87% were preventable with early detection and proper intervention.
Worm gearboxes deliver compact design, high reduction ratios in single stages, and self-locking capability. But the sliding mesh action that enables these benefits also creates specific failure modes you won’t see in helical or planetary units.
This guide covers the three most common worm gearbox problems we see from industrial clients, along with the specific diagnostic steps and solutions that actually work in real-world applications.
Problem #1: Overheating – The Progressive Failure Path
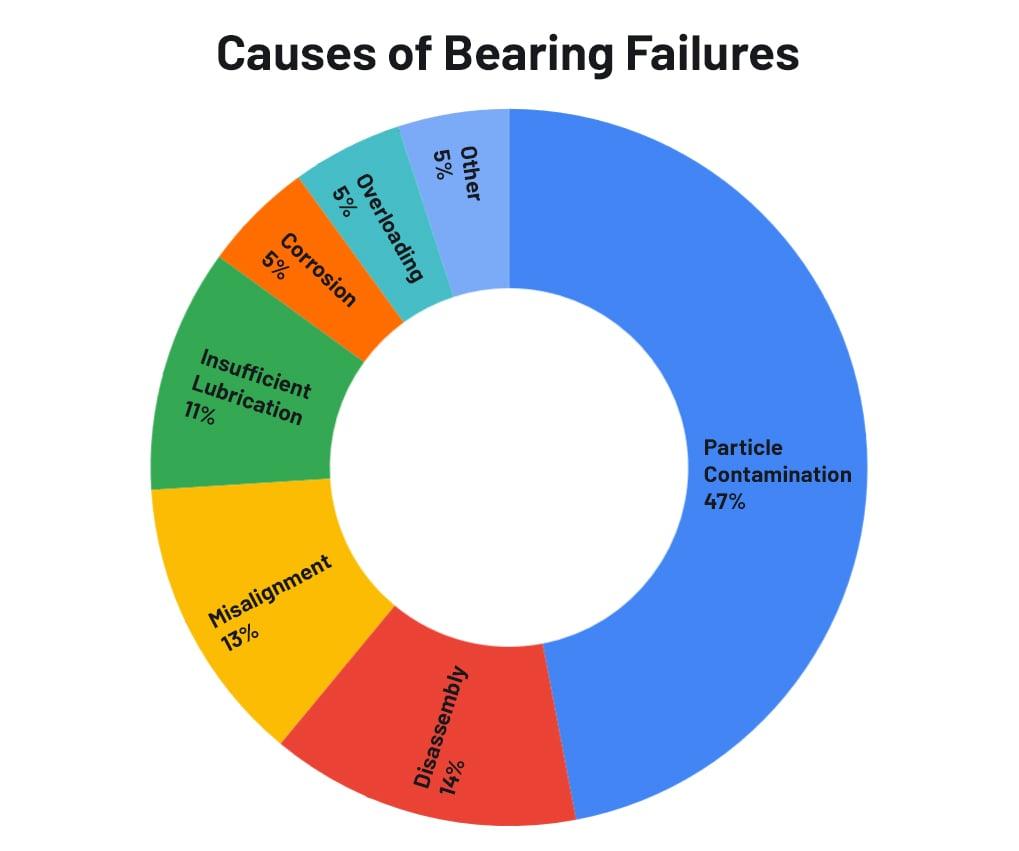
Worm gearbox overheating accounts for 41% of all failures we analyze. The sliding contact between steel worm and bronze wheel generates friction heat—it’s inherent to the design. The question isn’t whether your gearbox will generate heat, but whether it can dissipate heat fast enough.
How Hot Is Too Hot?
Normal operating range: 50-80°C (housing surface temperature)
Warning zone: 85-95°C – efficiency drops, oil degradation accelerates
Critical threshold: Above 95-100°C – lubricant film breaks down, metal-to-metal contact begins
Once temperatures exceed 100°C, you’re in a death spiral. Oil viscosity drops, friction increases, temperature rises further. We’ve seen bronze worm wheels destroyed in 48-72 hours of continuous operation at these temperatures.
Overheating Diagnosis
Step 1: Establish baseline temperature
- Measure housing temperature at multiple points using infrared thermometer
- Record ambient temperature
- Calculate temperature rise (gearbox temp – ambient temp)
Step 2: Compare to specifications
- Check nameplate for thermal rating
- Verify against operating conditions
Step 3: Identify the cause
Root Cause #1: Overload Condition
Symptoms:
- Temperature rise correlates with production cycles
- Unit runs cool during light loads, hot during peak demand
- Temperature exceeds rating even with proper oil and ventilation
Diagnosis: Measure actual load torque and compare to gearbox rating. Don’t forget service factor—most worm gearboxes require 1.5-2.0x service factor for reliability.
Solution:
- Upsize to next frame size (increases heat dissipation surface area)
- Reduce duty cycle if possible
- Add forced-air cooling or oil cooling system
- Consider helical gearbox if efficiency is critical
Real example: Packaging line customer had continuous overheating on NMRV075 at 80% rated load. Switched to NMRV090 at 60% rated load—temperature dropped 18°C, eliminated failures.
Root Cause #2: Wrong Lubricant or Low Oil Level
Symptoms:
- Overheating regardless of load
- Temperature higher than identical units on same line
- Oil level below sight glass minimum
Diagnosis:
- Check oil level with unit stopped and cooled
- Verify oil type against nameplate specification
- Check oil condition (color, smell, viscosity)
Solution – Oil Level:
- Add correct oil type to specified level
- Investigate why level dropped (leaks, consumption, initial underfill)
- Establish weekly level checks
Solution – Wrong Oil Type:
Common mistakes we see:
Mistake: Using motor oil or hydraulic oil Fix: Change to worm gear-rated oil ISO VG 220-460
Mistake: Too low viscosity (ISO VG 68 or 100) Fix: Switch to ISO VG 320 or 460 for most applications
Mistake: Mineral oil in high-temperature application Fix: Upgrade to PAG synthetic—reduces friction coefficient 15-25%, drops operating temperature 8-15°C
Critical: PAG oils are NOT compatible with mineral oils. Requires complete drain and flush before conversion.
Root Cause #3: Insufficient Heat Dissipation
Symptoms:
- Gradual temperature increase over weeks/months
- Cooling fins hot to touch but not transferring heat effectively
- Gearbox mounted in enclosed space or near heat source
Diagnosis:
- Inspect cooling fins for dust, grease, paint buildup
- Verify 6-12 inch clearance around gearbox for airflow
- Check ambient temperature (high ambient reduces heat transfer)
Solution:
- Clean cooling fins with compressed air monthly
- Remove any paint from fins (acts as insulation)
- Relocate gearbox away from ovens, dryers, other heat sources
- Install cooling fan for high duty cycle applications
- Consider external oil cooler with pump for extreme conditions
Problem #2: Excessive Noise and Vibration – Early Warning Signs
A properly functioning worm gearbox produces steady, low-frequency hum. Changes in noise pattern signal developing mechanical problems—usually weeks or months before catastrophic failure.
Worm gearbox noise problems fall into three categories based on sound characteristics:
Noise Type #1: High-Pitched Grinding or Squealing
Sound description: Metallic grinding, continuous during operation, pitch increases with speed
Root cause: Bearing failure
Diagnosis procedure:
- Isolate which end (input or output) using mechanic’s stethoscope
- Check for shaft play—grasp shaft and push/pull axially
- If shaft moves more than 0.5mm, bearings are worn
- Measure vibration at bearing locations (compare to baseline if available)
Solution: Replace bearings immediately. Continued operation will:
- Damage housing bore
- Score shafts
- Destroy gear mesh through misalignment
- Possibly seize and damage motor
Bearing replacement intervals:
- Standard applications: 30,000-50,000 hours
- High speed/high load: 15,000-25,000 hours
- Harsh environments: 10,000-20,000 hours
Pro tip: Replace both input and output bearings together. If one bearing failed from wear, the others are close behind.
Noise Type #2: Clunking or Knocking During Start/Stop
Sound description: Distinct “clunk” when starting, stopping, or reversing direction
Root cause: Excessive backlash from worn worm wheel
Diagnosis procedure:
- Lock input shaft (motor side)
- Grasp output shaft and rotate back and forth
- Measure rotational play at output flange
- Convert to linear measurement and compare to specifications
Typical backlash specs:
- NMRV 025-040: 0.15-0.25mm
- NMRV 050-075: 0.20-0.35mm
- NMRV 090-150: 0.30-0.50mm
When backlash exceeds specification by 50%+, replacement required
Why it happens: Bronze worm wheel is sacrificial—designed to wear instead of hardened steel worm. Normal wear pattern, accelerated by:
- Abrasive contamination in oil
- Inadequate lubrication
- Overload conditions
- Shock loads
Solution: Replace worm wheel. Best practice: replace worm AND wheel together for optimal tooth contact pattern.
Cost consideration: Worm wheel replacement typically costs 40-60% of new gearbox. If housing or shafts also show wear, replacement may be more economical than rebuild.
Noise Type #3: Vibration with Cyclic Pattern
Sound description: Rhythmic vibration or hum that varies with shaft rotation
Root cause: Misalignment between motor and gearbox, or gearbox and driven load
Diagnosis procedure:
- Stop equipment and check coupling alignment
- Measure offset and angular misalignment
- Look for coupling wear (sheared pins, worn elastomers)
- Check foundation rigidity (press on gearbox, check for movement)
Acceptable alignment tolerances:
- Parallel offset: <0.05mm
- Angular misalignment: <0.1 degrees
Solution:
For motor-to-gearbox misalignment:
- Use dial indicators or laser alignment tool
- Shim motor mount to achieve specification
- Verify alignment with shaft rotation (check every 90 degrees)
- Re-check after 48 hours of operation (settling)
For gearbox-to-load misalignment:
- Check driven equipment shaft alignment
- Verify mounting base is flat and rigid
- Consider flexible coupling to absorb minor misalignment
- DO NOT use flexible coupling to compensate for severe misalignment
Foundation issues: If mounting base flexes under load, alignment is impossible. Solutions:
- Grout base plate to concrete foundation
- Increase base plate thickness
- Add cross-bracing or gussets
- Switch to fabricated steel base instead of stamped
Problem #3: Oil Leakage – Multiple Failure Modes
Worm gearbox oil leaks create two simultaneous problems: the unit loses lubrication (starvation wear) while contaminants enter (abrasive wear). A small leak becomes catastrophic failure quickly.
Leak Location #1: Shaft Seals
Most common leak location – accounts for 68% of oil leaks
Symptoms:
- Oil seepage or dripping at input/output shafts
- Oil film on shaft visible outside housing
- Oil accumulation in coupling guard or on floor
Root causes:
Cause #1: Seal wear/hardening
- Heat cycles harden nitrile rubber
- Seal lip cracks or loses spring tension
- Shaft scoring from contamination creates leak path
Diagnosis:
- Check shaft surface at seal contact area for grooves
- Measure seal lip compression
- Verify seal material matches temperature rating
Solution:
- Replace seal (standard nitrile for <90°C, Viton for higher)
- If shaft is scored, options include:
- Speedi-Sleeve repair kit (slides over damage)
- Shaft replacement
- Reposition seal to contact fresh shaft surface
Cause #2: Internal pressure from clogged breather
When gearbox heats up during operation, air inside expands. Breather vent allows pressure relief. If breather clogs with paint, dust, or contamination, pressure builds and forces oil past seals.
Diagnosis:
- Remove and inspect breather
- Attempt to blow through it (should have minimal resistance)
- Check for paint overspray (common after equipment repainting)
Solution:
- Clean or replace breather monthly
- In dusty environments, use shielded breather design
- In washdown areas, use sealed breather with moisture protection
- After repainting equipment, verify breather wasn’t painted over
Leak Location #2: Housing Mating Surfaces
Symptoms:
- Oil seepage at housing split-line
- Oil weeping from mounting flange
- Leaks at output cover or end caps
Root causes:
Cause #1: Loose bolts from vibration
Constant vibration loosens housing bolts over time, creating gaps in gasket seal.
Diagnosis:
- Check all housing bolts with torque wrench
- Look for rust stains at bolt locations (indicates long-term leakage)
Solution:
- Drain oil
- Remove bolts and clean mating surfaces
- Apply anaerobic gasket maker (Loctite 518 or equivalent)
- Reinstall with proper bolt torque:
- M6: 10 Nm
- M8: 25 Nm
- M10: 50 Nm
- M12: 85 Nm
- Allow 2 hours cure before refilling oil
Cause #2: Damaged gasket or improper assembly
Occurs during maintenance or repair when housing is opened.
Prevention during maintenance:
- Always replace gaskets (don’t reuse old gaskets)
- Clean mating surfaces thoroughly (no old gasket material)
- Check for burrs or damage on sealing surfaces
- Tighten bolts in star pattern to even torque
- Don’t overtighten (can distort housing)
Leak Location #3: Sight Glass or Level Plug
Symptoms:
- Oil seepage around sight glass
- Drips from oil level plug
Solution:
- Sight glass: Replace O-ring seal, verify glass isn’t cracked
- Level plug: Replace copper crush washer, verify threads aren’t damaged
Systematic Troubleshooting Approach
When facing worm gearbox problems, use this diagnostic sequence:
Step 1: Document current condition
- Operating temperature (infrared scan)
- Noise characteristics (type, frequency, timing)
- Oil level and condition
- Visible leaks
- Vibration measurements
Step 2: Compare to baseline
- Nameplate specifications
- Previous maintenance records
- Similar units on same production line
Step 3: Prioritize issues
- Safety hazards (leaks, overheating >100°C)
- Imminent failure indicators (bearing noise, severe vibration)
- Performance degradation (efficiency loss, excessive backlash)
Step 4: Implement solution
- Start with simple/fast fixes (add oil, clean fins)
- Progress to mechanical repairs (bearings, seals)
- Consider replacement if multiple major issues
Step 5: Verify results
- Re-measure temperature after changes
- Document noise improvement
- Confirm leak repair
- Establish new baseline for future comparison
Quick Reference: Troubleshooting Table
| Symptom | Most Likely Cause | Quick Check | Immediate Action |
|---|---|---|---|
| Temperature >95°C | Overload or wrong oil | Check load, oil level, viscosity | Reduce load, change oil |
| High-pitched grinding | Bearing failure | Check shaft play | Replace bearings immediately |
| Clunking sound | Excessive backlash | Measure gear play | Schedule gear replacement |
| Vibration | Misalignment | Check coupling | Realign equipment |
| Shaft seal leak | Worn seal or plugged breather | Inspect seal, check breather | Replace seal, clean breather |
| Housing leak | Loose bolts | Torque check all bolts | Re-torque, add sealant |
Preventive Maintenance Reduces Problems
Our failure analysis data shows clear patterns:
Facilities with systematic preventive maintenance:
- Average 45,000 hours between failures
- 73% of issues detected before production impact
- 91% of repairs completed during scheduled downtime
Facilities with reactive “fix when broken” approach:
- Average 12,000 hours between failures
- 89% of failures cause unplanned downtime
- 3.7x higher total maintenance costs over 10 years
Minimum preventive program should include:
Weekly:
- Visual inspection (leaks, noise, temperature)
- Oil level check
Monthly:
- Clean cooling fins
- Clean/check breather
- Temperature measurement and trending
Quarterly:
- Vibration analysis
- Oil sampling (if using synthetics)
- Bolt torque verification
Annually:
- Oil change (mineral oils)
- Seal inspection
- Backlash measurement
- Bearing condition assessment
When to Repair vs. Replace
Repair makes sense when:
- Single component failure (bearing, seal, or wheel)
- Housing and shafts in good condition
- Repair cost <50% of replacement
- Standard rebuild parts available
- Downtime can be scheduled
Replacement recommended when:
- Multiple component failures
- Housing damage (cracks, worn bearing bores)
- Shaft wear or damage
- Obsolete model with limited parts availability
- Efficiency upgrade justifies new technology
- Repair cost >60% of new unit
Total cost calculation: Don’t just compare purchase price to repair cost. Include:
- Labor cost for rebuild
- Downtime during repair
- Probability of additional failures
- Energy savings from new, more efficient unit
- Warranty on new vs. rebuilt
Need Expert Diagnosis?
Most worm gearbox problems have straightforward solutions when you know what to look for. The challenges we see most often:
- Temperature issues – 90% resolve with proper oil selection or load management
- Noise problems – Early detection prevents catastrophic failures
- Oil leaks – Usually simple seal or breather fixes if caught early
Our engineering team provides technical support for troubleshooting complex issues. If you’re experiencing recurring problems or need application-specific guidance, contact us for diagnostic consultation.